Less Trees Equal More Tornados
Prevent Tree Damage with Proper Pruning
Ok folks...after the latest tornado to spin through Dallas proper, it's time to talk urban heat island and preventative tree care. Unpruned, poorly and over-pruned trees are no match for 70-80 mile an hour winds. And you know this is only going to get worse, right?
With all the building going on in the DFW....more roads, more concrete, more roofs, more hardscape...we're only becoming a bigger heat sink. Without more greenscaping and tree canopy, the urban heat island problem continues to worsen. The hotter it gets here, the more extreme and frequent the intense weather events; such as destructive thunder storms, floods, and tornadoes. We've already witnessed that first hand the last few years.
To begin mitigating the heat sink issue here in DFW, we need to get another 250,000 trees planted. But with every major storm we have, we lose more tree canopy. After having lost power for a week, I'm now back at my house and checking out the neighborhood damage. As I walked my neighborhood and around White Rock Lake this morning, the extensive tree destruction all around us is so disheartening. And what's even worse, much of the tree damage and loss could have been prevented with good tree care and structural pruning.
It's cheaper to pay more for good preventative pruning and keep your trees, than it is to pay to lose them...
But Professional Tree Pruning is too Expensive!
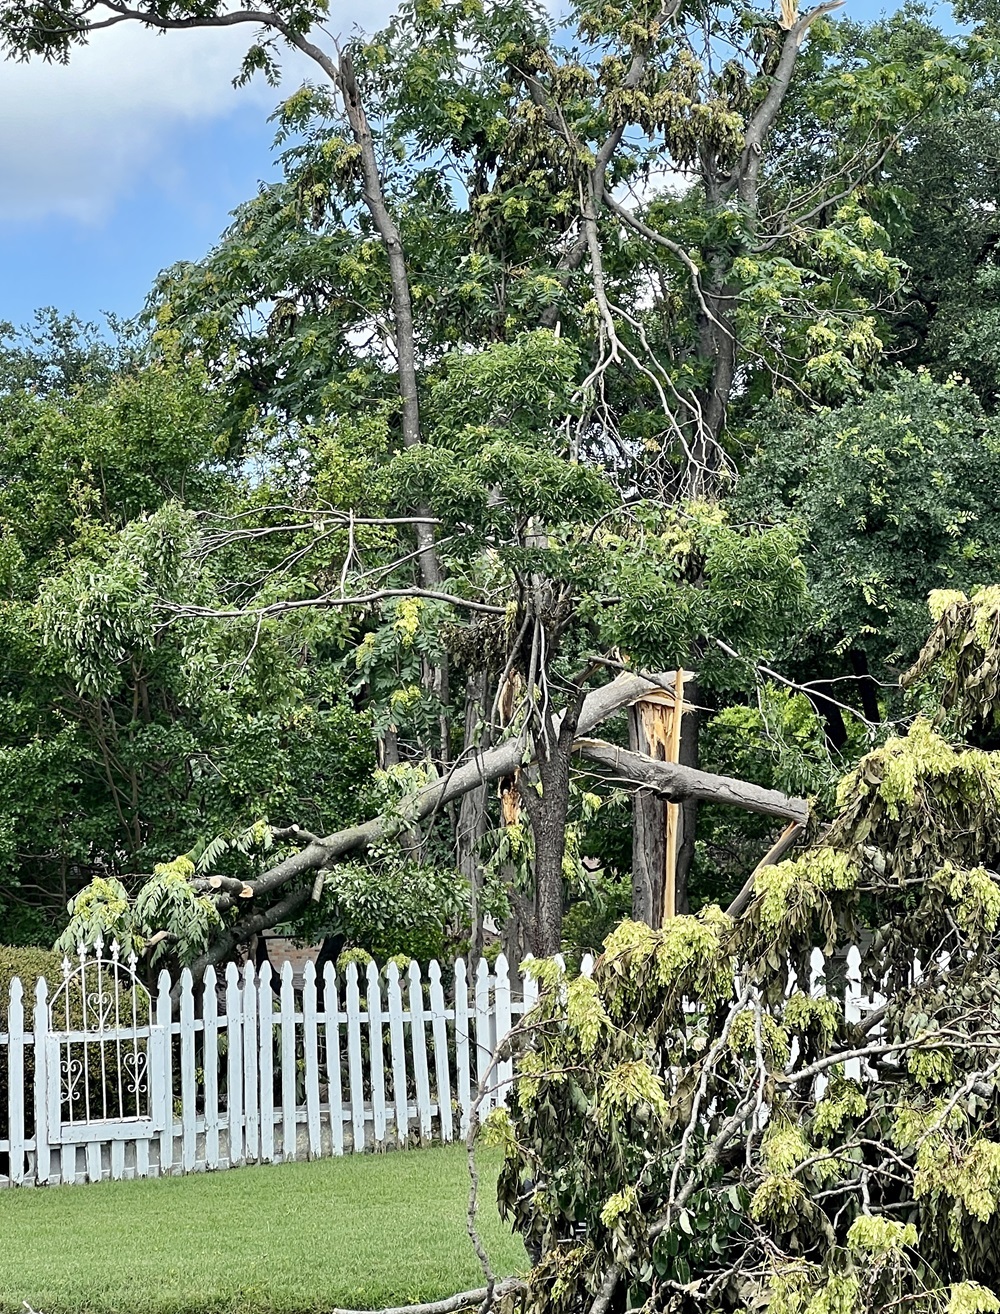
Neighbor's trees split in storm
PC: Leslie F. Halleck
Unfortunately, most homeowners just don't want to have their trees pruned. Or, they don't want to pay someone qualified to do it RIGHT. All those guys in trucks running around with ladders and chainsaws sticking tree pruning cards on your door? Sad to say, but most of those guys have no idea what they are doing when it comes to tree structure and physiology. Sure, they know how to use power tools, but that's about it. What they are doing is a huge amount of damage to your trees, which actually makes them significantly weaker and susceptible to damage in storms. And sure, they may be nice and you might like dealing with them. But that doesn't do you much good when your tree splits down the middle or falls on your house in the next storm.
A lot of the tree damage - and fallen trees - I see is also due to rot or disease that has gone unnoticed or undiagnosed because the trees have never been inspected by a professional.
So you can pay a little more upfront to have your trees cared for (and saved) by a professional who knows what they are doing - and have a healthier tree that's much more likely to be saved from storm damage; OR you can "save" a little up front with random landscape crews running around trying to get your tree business; but it will cost you a lot more on the back end when you have significant storm damage and or lose your tree/s altogether.
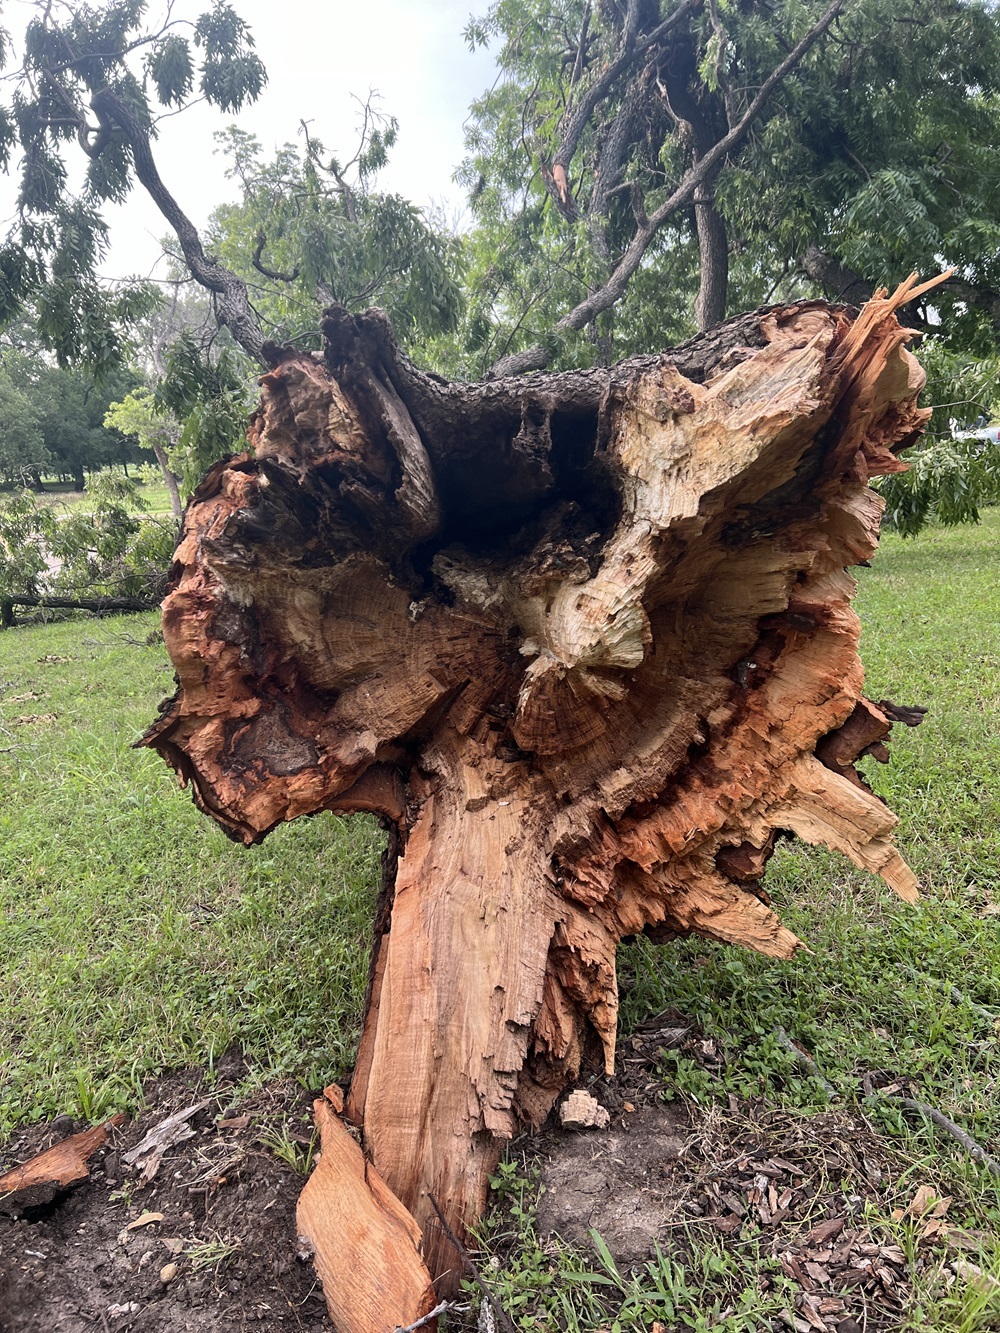
Large fallen tree showing large areas of internal decay
PC: Leslie F. Halleck
Not every tree that is severely damaged must be removed. Some trees can be placed on a restoration plan and you can work with a qualified arborist to rehabilitate them. Cabling and bracing can also save large branches and improve structural integrity. Consider the benefits to the ecosystem and climate that this can have!
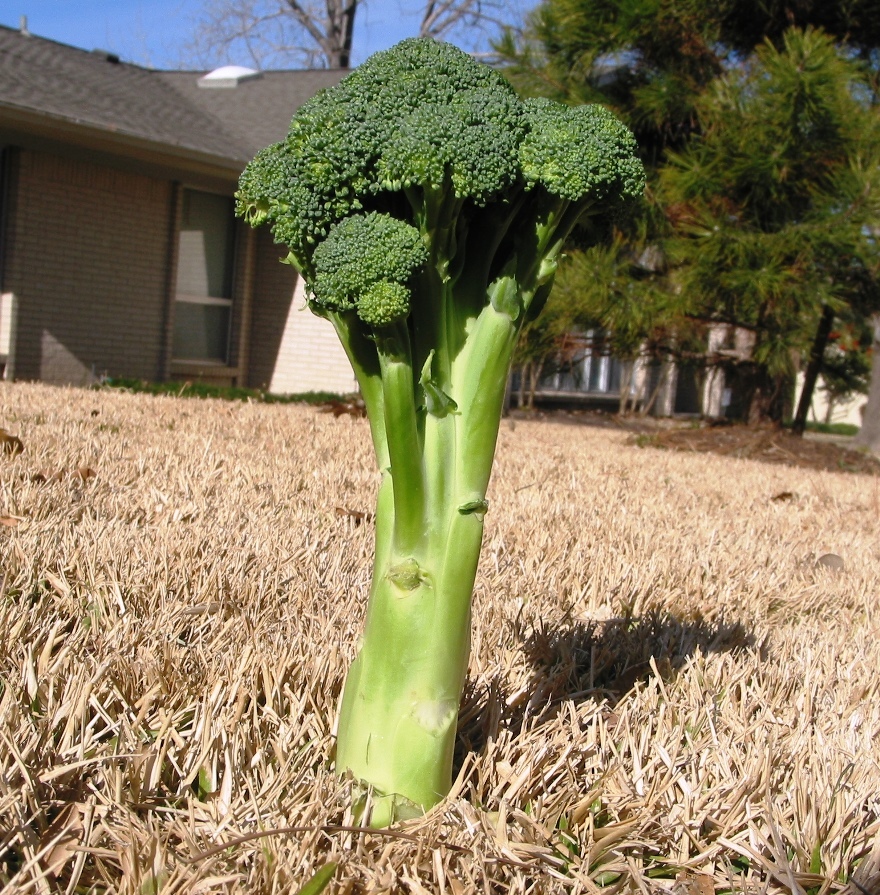
No More Broccoli Trees!
All those "broccoli trees" those guys are creating around town... you know, the ones that are heavily limbed up and all the inner branches are removed so you can get more sun to that scraggly patch of useless lawn? Yeah, those trees are far more susceptible to storm damage because all the canopy weight has been left at the very ends of the branches...weighing them down and increasing the chances they'll snap in a storm.
The term used more frequently in the industry for this type of bad pruning is "lion's tailing"

An example of lion's tail pruning, or a broccoli tree! This type of pruning is a recipe for disaster for your tree...and no small patch of lawn is worth it...
Texas Trees Foundation Urban Heat Island Study
Study Highlights
• Tree planting and preservation in Dallas can change the weather – producing cooler days and nights than will occur if tree canopy continues to be lost.
• The benefits of greening strategies can be as high as 15°F of cooling in some areas on hot summer days.
• Tree planting and preservation can save lives when implemented in concert with more reflective roofing and paving materials, with these combined strategies found to reduce the number of deaths from hot weather by more than 20%.
• Tree planting and preservation was found to be more than 3.5 times as effective in lowering temperatures as cool materials strategies.
• Dallas can achieve significant cooling and health benefits by planting 250,000 trees
Urban Heat Island Management Study, Dallas 2017
Personal Accountability & Responsibility
As a Certified Professional Horticulturist who has managed tons of landscapes and trees over the years, and worked along side with experienced arborists who know what they are doing, I'm begging you take better care of your established trees. Proper preventative pruning - that doesn't remove too much canopy and respects structural integrity and physiology of the tree - not only helps you keep strong valuable trees on your property but is also a more sustainable practice that helps increase our much needed urban tree canopy. In the face of intense climate change that's playing out before our eyes, it's the logical and responsible thing to do.
A big reason power was down so long in Dallas was due to vegetation down on lines. So the next time the power is down for a week due to mostly "vegetation" don't get mad at the city...don't get mad at the crews working hard to get it back up. How about as residents we focus on proper management of the trees on our own properties first? That means:
- Do not plant trees in city easements under power lines. Not only are you not supposed to do that in the first place, but most of you aren't having those trees properly pruned AND you're all screaming to high heaven when the power company has to send their contractors out to "butcher" them...if that's you, you probably shouldn't scream when your power is out because that tree lost branches and took down power lines. If you insist on planting trees in the easement, make sure their mature size is shorter than the power lines...that means NO LIVE OAKS. And know that if you do plant in a parkway/easement, you are responsible for maintaining the tree to code, even though it becomes the city's property.
- Have your trees inspected at least every 2-3 years by an experienced certified arborist, or certified professional horticulturist, and have preventative pruning performed to prevent damage. If you have a lot of large trees, I'd recommend scheduling an annual inspection. You may not need pruning that often, but other issues may be found in an inspection.
- If you have large trees on your property that are adjacent to lines, or are on your alley near lines, know the pruning code. You may have your own tree company prune tree growth that is 6-feet or farther away from power lines; they can also prune your trees near your house service drop line connection (you are responsible for pruning clearance around the service drop, not the city or powerline company). BUT you may not prune, or have your own company prune, tree growth that is within 6-feet of power lines. You must call the company that manages the power lines (such as Oncor) first to report pruning needs and they will send their contractors out to prune. Know that in this situation you don't get to decide HOW the tree is pruned. Whatever growth is encroaching on the lines will get pruned away...and yes, that might mean half the tree canopy and that's just how it us. Otherwise, those branches could take down your power lines.
- Remember, the trees on your property are just that - your property. You are responsible for their care, not the city.
- Remember, before you plant a tree, look up for power lines and call the “Call Before You Dig" toll-free line at 1-800-344-8377 to locate any buried power lines.
- Right Plant, Right Place....when planting new trees, know the mature size, both height and canopy (crown) width, of the tree species you're planting. If there are powerlines nearby, make sure the tree you're planting won't grow to impede them. We also need more species diversity in DFW, and most smaller urban lots won't accommodate live oaks so it's good to look at other tree species (not to mention live oaks can be seriously damaged in the severe extended freezes we get here in DFW every few years -and the consequences of such damage may not manifest until years later). Here is a list of trees and sizes from the City of Dallas.
- Tree Pruning Pick Up by the City: It's not the city's job to pick up all the trimmings or downed tree remains when you have tree work done. It's YOURS- that is part of the cost of tree pruning and removal. Good tree companies will chip and haul away all debris for composting. They will NOT dump it on your easement. Dallas has limitations on when and how much brush you can put out so be prepared for a citation and fee if you overload them with your entire tree.
- Bulky Trash Pick Up Storm Schedule: This could take months folks, as it has in the past. Residents are being asked to HOLD any non-storm related bulky trash. Remember Dallas also has volume limitations now on bulky trash. You may get lucky and they'll pick up your excess without a fine this time, but don't count on it and don't get mad. We all have to pay for social services, which this is.
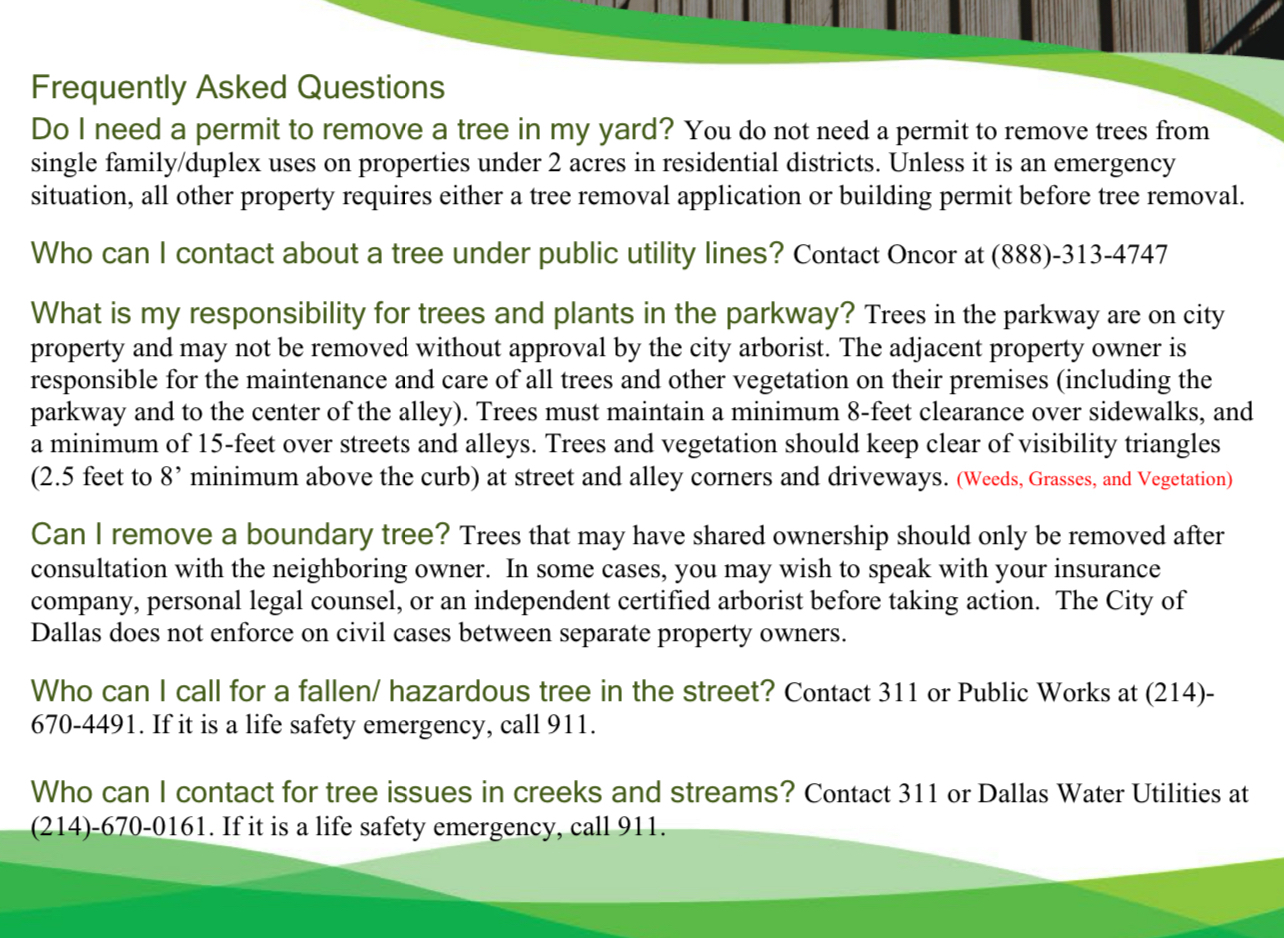
Some FAQs from the Dallas City Tree Code - Note maintenance requirements of the parkway adjacent property owner.
Property Rights: Who is responsible for pruning?
I'm adding this section into the original post due to some questions I received. Depending your your city code, this information may vary - but here in Texas, any tree growth hanging over your property line is yours to prune. I'd recommend you taking full responsibility for your trees and paying for all the pruning/care to be done by qualified professionals. But that means you need to have good open communication with your neighbor and work together to keep your trees healthy.
Question: "One thing you did not address is when to trim neighbors' trees hanging over one's house or property. Also, if the homeowner has a universal right to trim her own tree growing over the property line, does that extend to the arborist she hires? What happens if she hires an arborist and the neighbor threatens them away from trimming her trees which are growing onto his property? Etc.!"
My Answer: Legally anything hanging over your property line is yours to prune at your discretion (and vice versa for your neighbor), which can be problematic for the health of the tree if the neighbor who doesn't "own" the tree, applies extreme/poor pruning. I have large trees for which 50% of the canopy extends over my neighbor's property line and roof. Being a professional, I told them from the get go I needed to manage my own trees- I would pay for all the pruning, if they would let my crews onto their property to prune and clear their roof line. Yes, I have to bear the full cost for the pruning, but it's the only way to keep the trees healthy. I work with my neighbor to give them notice about when pruning crews will be coming and need access, and they let me know if they feel there are any issues. Legally, your neighbor doesn't have to let your arborist onto their property to prune what hangs over their property line - so it takes having good communication with your neighbor to negotiate that. But it is what's best for trees overall!
Good pruning will be far less noticeable than bad pruning....
DFW Pros I can Recommend
This is not a sponsored post and I've spoken to no one about listing them here. Consider this a Public Service Announcement!
Dallas/Fort Worth: Personally, with my own trees (which have never had any storm damage), I've worked with Scott Dahlberg and his dedicated crews -first with Preservation Tree Services, and now Tree Tech. I've also worked professionally with Scott for many years with clients and properties I've managed. Preservation Tree was also my client for almost 10 years.
Other experienced and qualified companies I can personally recommend (in no particular order):
Sam Hill Tree Care
Arborilogical Services
SaveATree
Bartlett's Tree Experts
Texas Tree Surgeons
Davey Tree
Note: These tree care companies will likely be overrun with storm damage assistance requests - they will prioritize existing customers first so you may need to be patient. But once a customer you'll be able to get faster service in the future.
