Have you harvested your garlic?
May 26, 2012
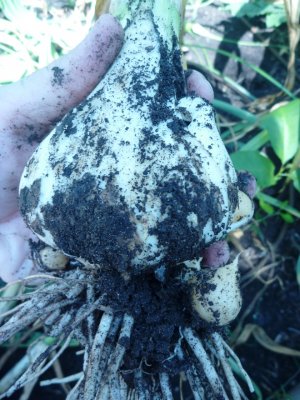 Texans..it's about that time to harvest your garlic, if you haven't done so already. Click HERE to read more about garlic
May 26, 2012
Texans..it's about that time to harvest your garlic, if you haven't done so already. Click HERE to read more about garlic
May 24, 2012
Here's the story on NBC5, with Omar Villafranca, on urban backyard beekeeping! Enjoy.
View more videos at: http://nbcdfw.com.
One quick note - the frame they do a close up on and say it's capped honey, is actually brood (bee larvae), not capped honey. Just a clarification!May 23, 2012
Shot a segment today with NBC 5's Omar Villafranca on backyard bees in the city! Should run this evening on the 10pm news, but if it's rescheduled I'll repost.

if you're interested in keeping bees in the DFW area, check out TBA www.texasbeekeepers.org for links to your local group, where you can take classes and attend regular meetings.
May 22, 2012
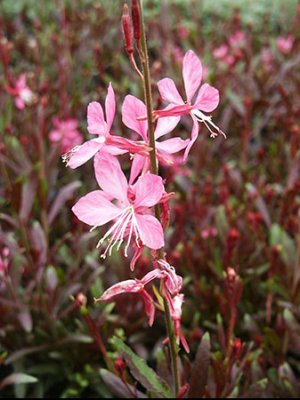 Looking for a super hardy drought tolerant Texas native that is also beautiful and blooms FOREVER?? Ok, maybe not forever, but let's say April through fall. That's a pretty long time. Plus, it attracts butterflies. If that sounds up your alley, then Gaura lindheimeri needs to be on your garden shopping list. 'Whirling Butterflies' is a favorite white-flowered varieties, but it also comes in pink...'Ballerina Rose'...lovely
May 20, 2012
Were you a smart gardener this spring? Did you let some of your cool season herbs and veggies to flower (which is always lovely) so you could collect seed? If so, then you'd have been collecting seed over the last few weeks. Arugula and Dill are two species that are particularly giving with their seed (most of my dill plants are actually volunteers from last year) and nows the time to collect seed from both.
 Arugula seed. I've been harvesting this past week.
 Dill seedheads...so pretty! I'll be harvesting seeds today.
Both Arugula and Dill are two edibles that make fantastic ornamentals, so it just makes sense to let them go to flower and then seed in your garden. Now, this only works with open-pollinated varieties, not hybid cultivars. For example, 'Celebrity' tomatoes are an F1 hybrid...the seed you save from that plant won't come true to type (you'll get seedlings with a lot of different variants that express characteristics of the original parent plants). But with 'Green Zebra' tomato, an open-pollinated heirloom, you can save the seed and get another generation of 'Green Zebra' tomatoes. So for plain old Arugula and Dill, you can save the seed.
Old 35mm film containers with the lids make great storage for seeds. Or use any container that will keep your seeds completely dry. Make sure to label the container with the plant and date. Some folks keep them in the fridge to preserve viability. I'll be starting these Arugula and Dill seeds outdoors in September for the cool season!
May 19, 2012
I'm still in love with all the new Echinacea varieties out on the market these days. It's prime conflower season right now with them all coming into full bloom. Most are highly fragrant, which you don't get from the standard E. purpurea. A few that are blooming in my garden right now are 'Mama Mia', 'Sundown', 'Summer Sky' and 'Tangerine Dream'. Sooooo lovely! What's blooming in your garden?
 Echinacea 'Sundown'
May 12, 2012
So I agreed, last minute and under persuasion of some friends, to do a Diorama to donate to today's Diorama-O-Rama Event benefiting Cafe Momentum. The event is in Dallas today from 4pm-8pm. It's a great cause and you'll get to bid on some very fun art.

This would be me in the Amazon in Peru, with some of my photographs and my insect/flower illustrations. And my pink locust tending his own little garden, lol. It's some silly fun...Swing by the event if you can. It's a $5 donation to get in the door, then you can bid on a plethora if dioramas, both in silent auction and live auction. Good times!
April 27, 2012
For those of you living in the City of Dallas, new permanent watering restrictions have gone into effect as of April 23rd, 2012.
But don't worry...you can still get all your gardening on! The new ordinance allows for you to fulfill all your typical watering needs for established landscapes and new plantings. The twice per week restriction only applies to automated sprinkler systems or above ground sprinklers. You may run these sprinklers twice per week on your assigned days (addresses ending in even numbers can water Thursday and Sunday, addresses ending in odd numbers may water on Wednesdays and Saturdays.) You should not run your sprinkler systems between10am-6pm. A deep watering once per week, or twice per week in the heat of the summer, is all you need to properly care for established lawns, trees and foundation plantings.
The restrictions on additional hand watering, soaker hoses and drip irrigation that were in place under the previous Stage 1 ordinance have been lifted under the new ordinance! You may now provide any needed supplemental watering via hand watering (hose end, watering can, bucket, rain barrels, etc.), soaker hoses, drip irrigation, TreeGator bags, on any day of the week. That means you'll have no problem establishing and maintaining your new plantings of trees, foundation plantings, vegetable gardens, containers; all of which are crucial to our urban environment.
Note: if you are using rainwater, well water or grey water (non-potable water) you are not required to follow any restrictions or watering schedule. Great news!