How to take Great Plant & Landscape Photos With Your Smartphone Camera
Smartphone Settings for Better Plant & Landscape Photos
Originally published in the July 2019 issue of Garden Center Magazine
Can we talk about photography for a second? Because I think we need to. When it comes to leveraging your strengths for effective marketing, great photographs are fundamental. Yet, taking and cataloging good photographs of plants, facilities, merchandising, installations and people gets pushed to the back burner by many garden centers. All this beauty at your fingertips, yet many of you aren’t putting it to work.
Working with many businesses across the green industry, getting and using photographs is an ongoing primary struggle. Good photos are always at the top of my request list, but I’m usually met with the response, “We’re just too busy to take pictures.” But busy will never stop; so just like anything else in your business, you must choose to carve out time for photography. It’s tough to do a great job at marketing when you don’t have great visuals to communicate to your customers.
There’s no doubt that without decent photographs, social media efforts can fall totally flat. Print ads rely on well-composed high-resolution images. Poor photos on your website will have visitors bailing on you as quickly as they arrived.
Smartphone Cameras
The beauty of today’s smartphones is that most function as incredibly good digital cameras. You can take beautiful and professional looking images with the phone you walk around with all day. So, there’s really no excuse to getting a few good images on a regular basis. Just as with any good digital camera, there are some handy smartphone setting tips that will help you — as a non-professional photographer — get the best photos you can. I’ll focus on the iPhone because that’s what I use, along with most professionals I work with. If you have a different type of smartphone, use these guidelines to find the corresponding settings.
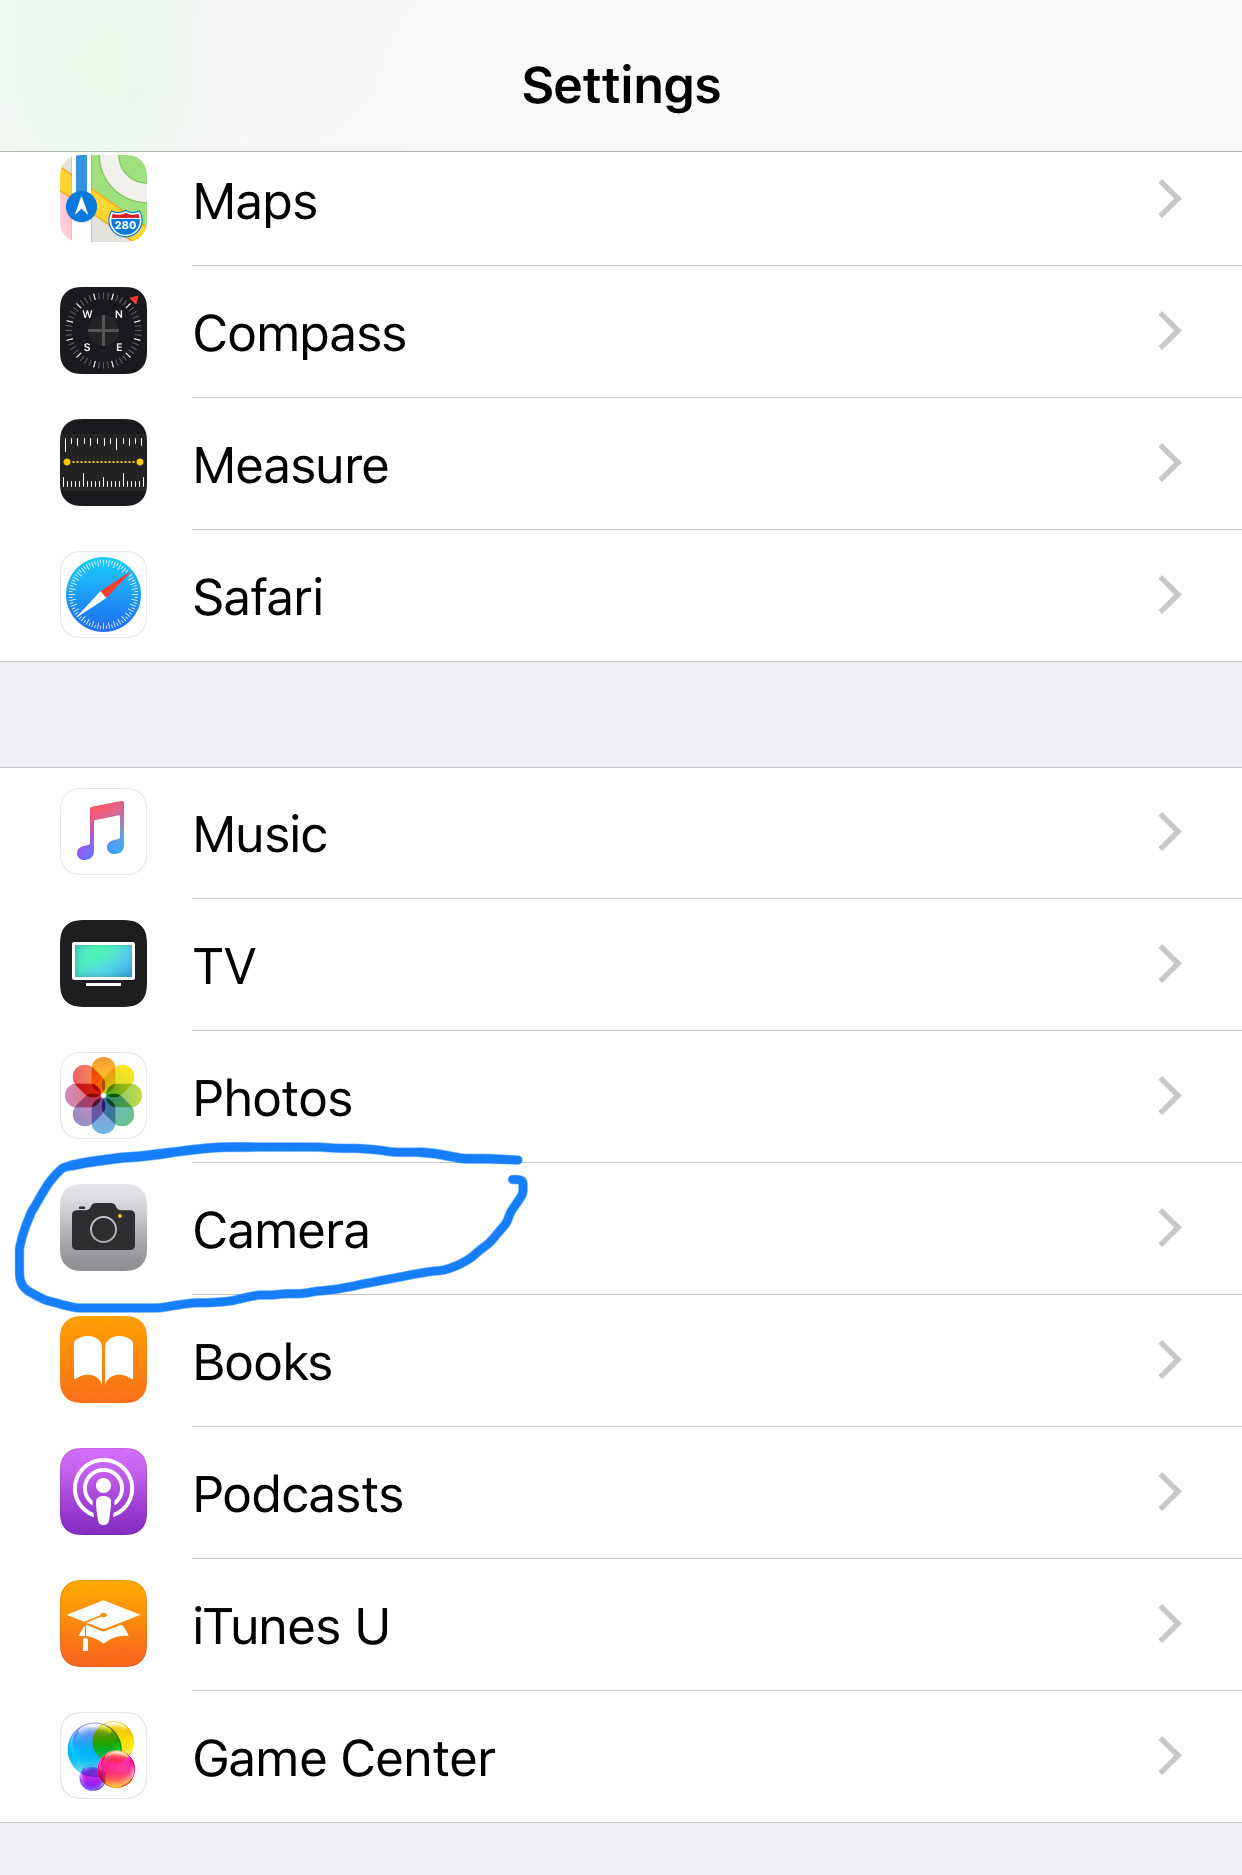
• First: Switch on High Dynamic Range (HDR) for the best exposure.
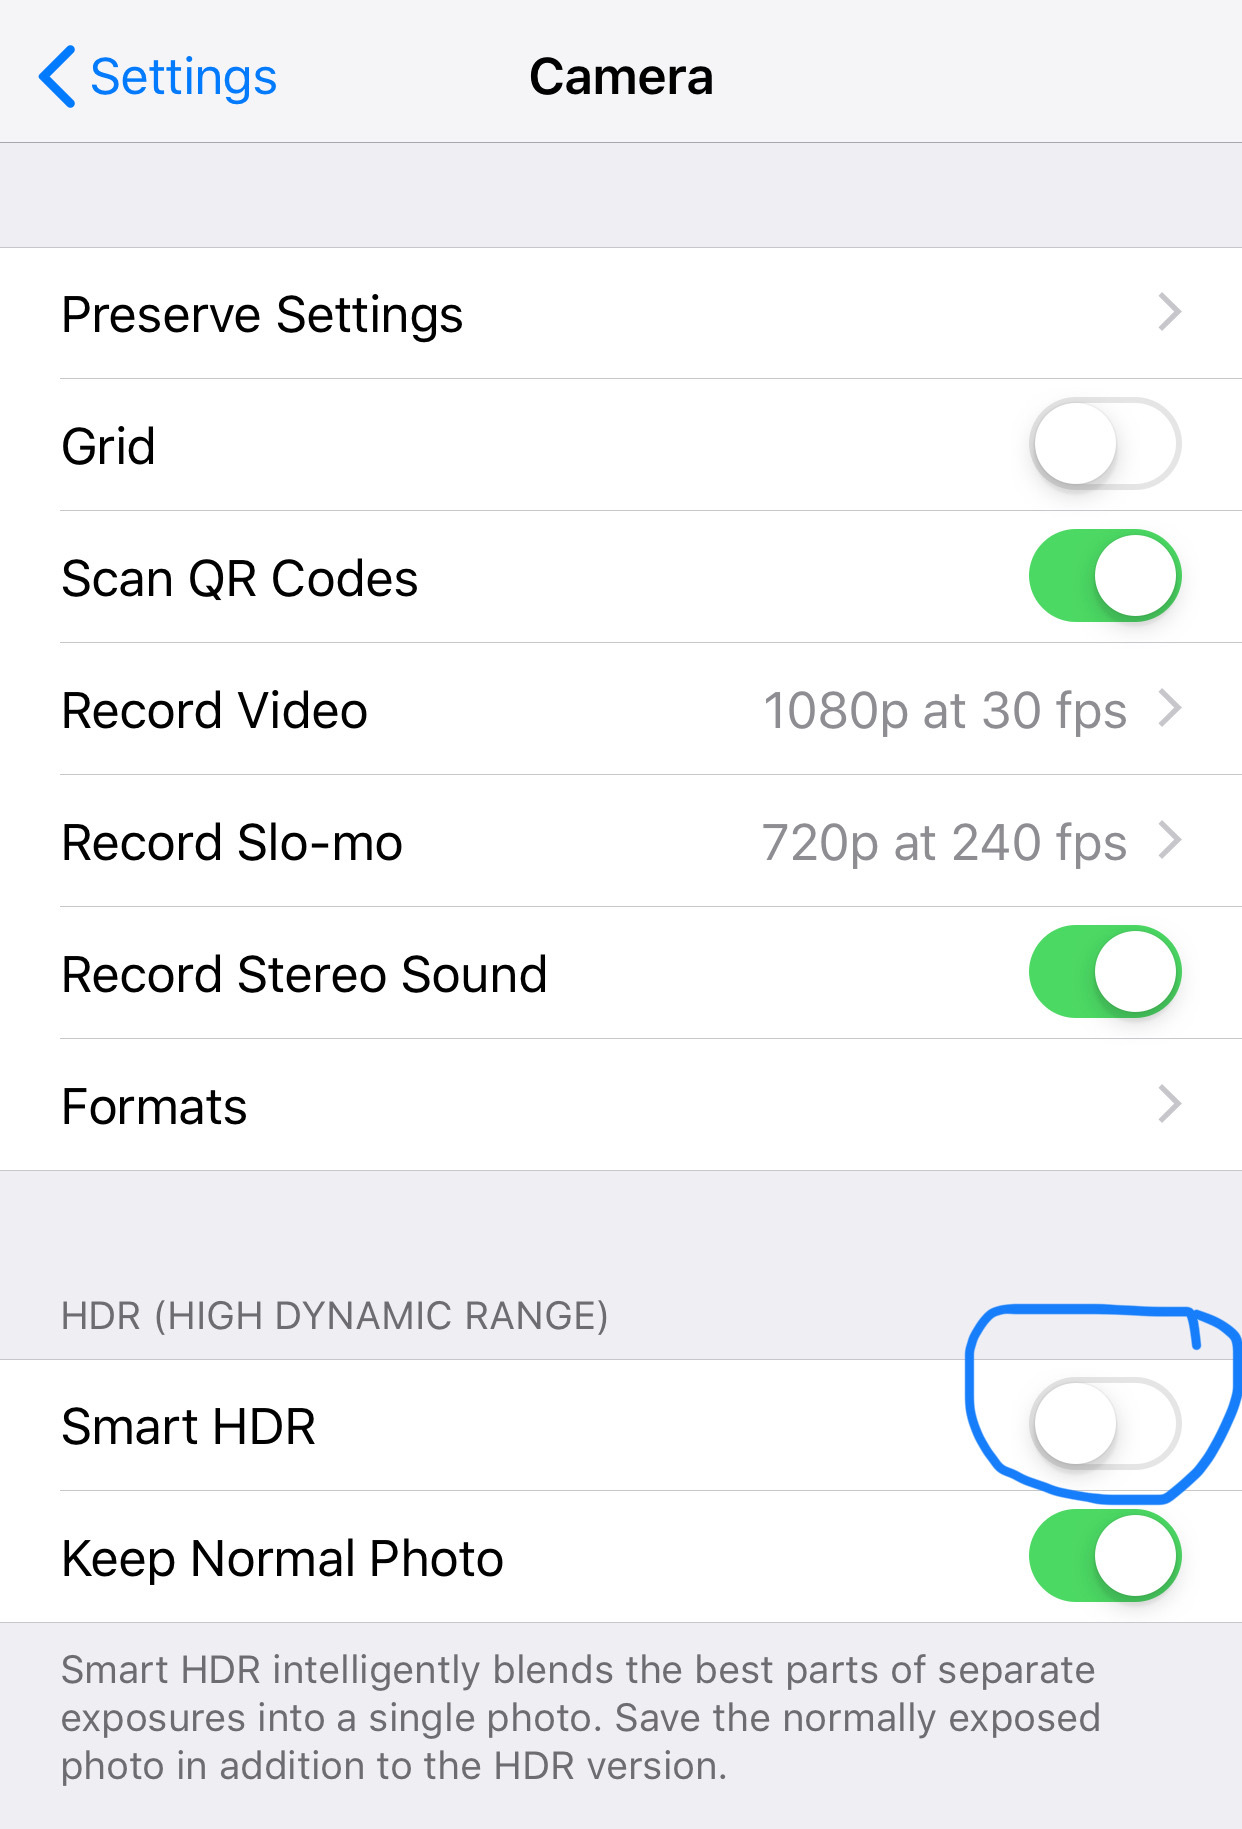
Go into Settings and select Camera. Make sure that AUTO HDR is turned OFF. On some phones this setting is called Smart HDR. It’s probably on by default on your phone, so go ahead and switch it off. Leave the Keep Normal Photo switched ON.
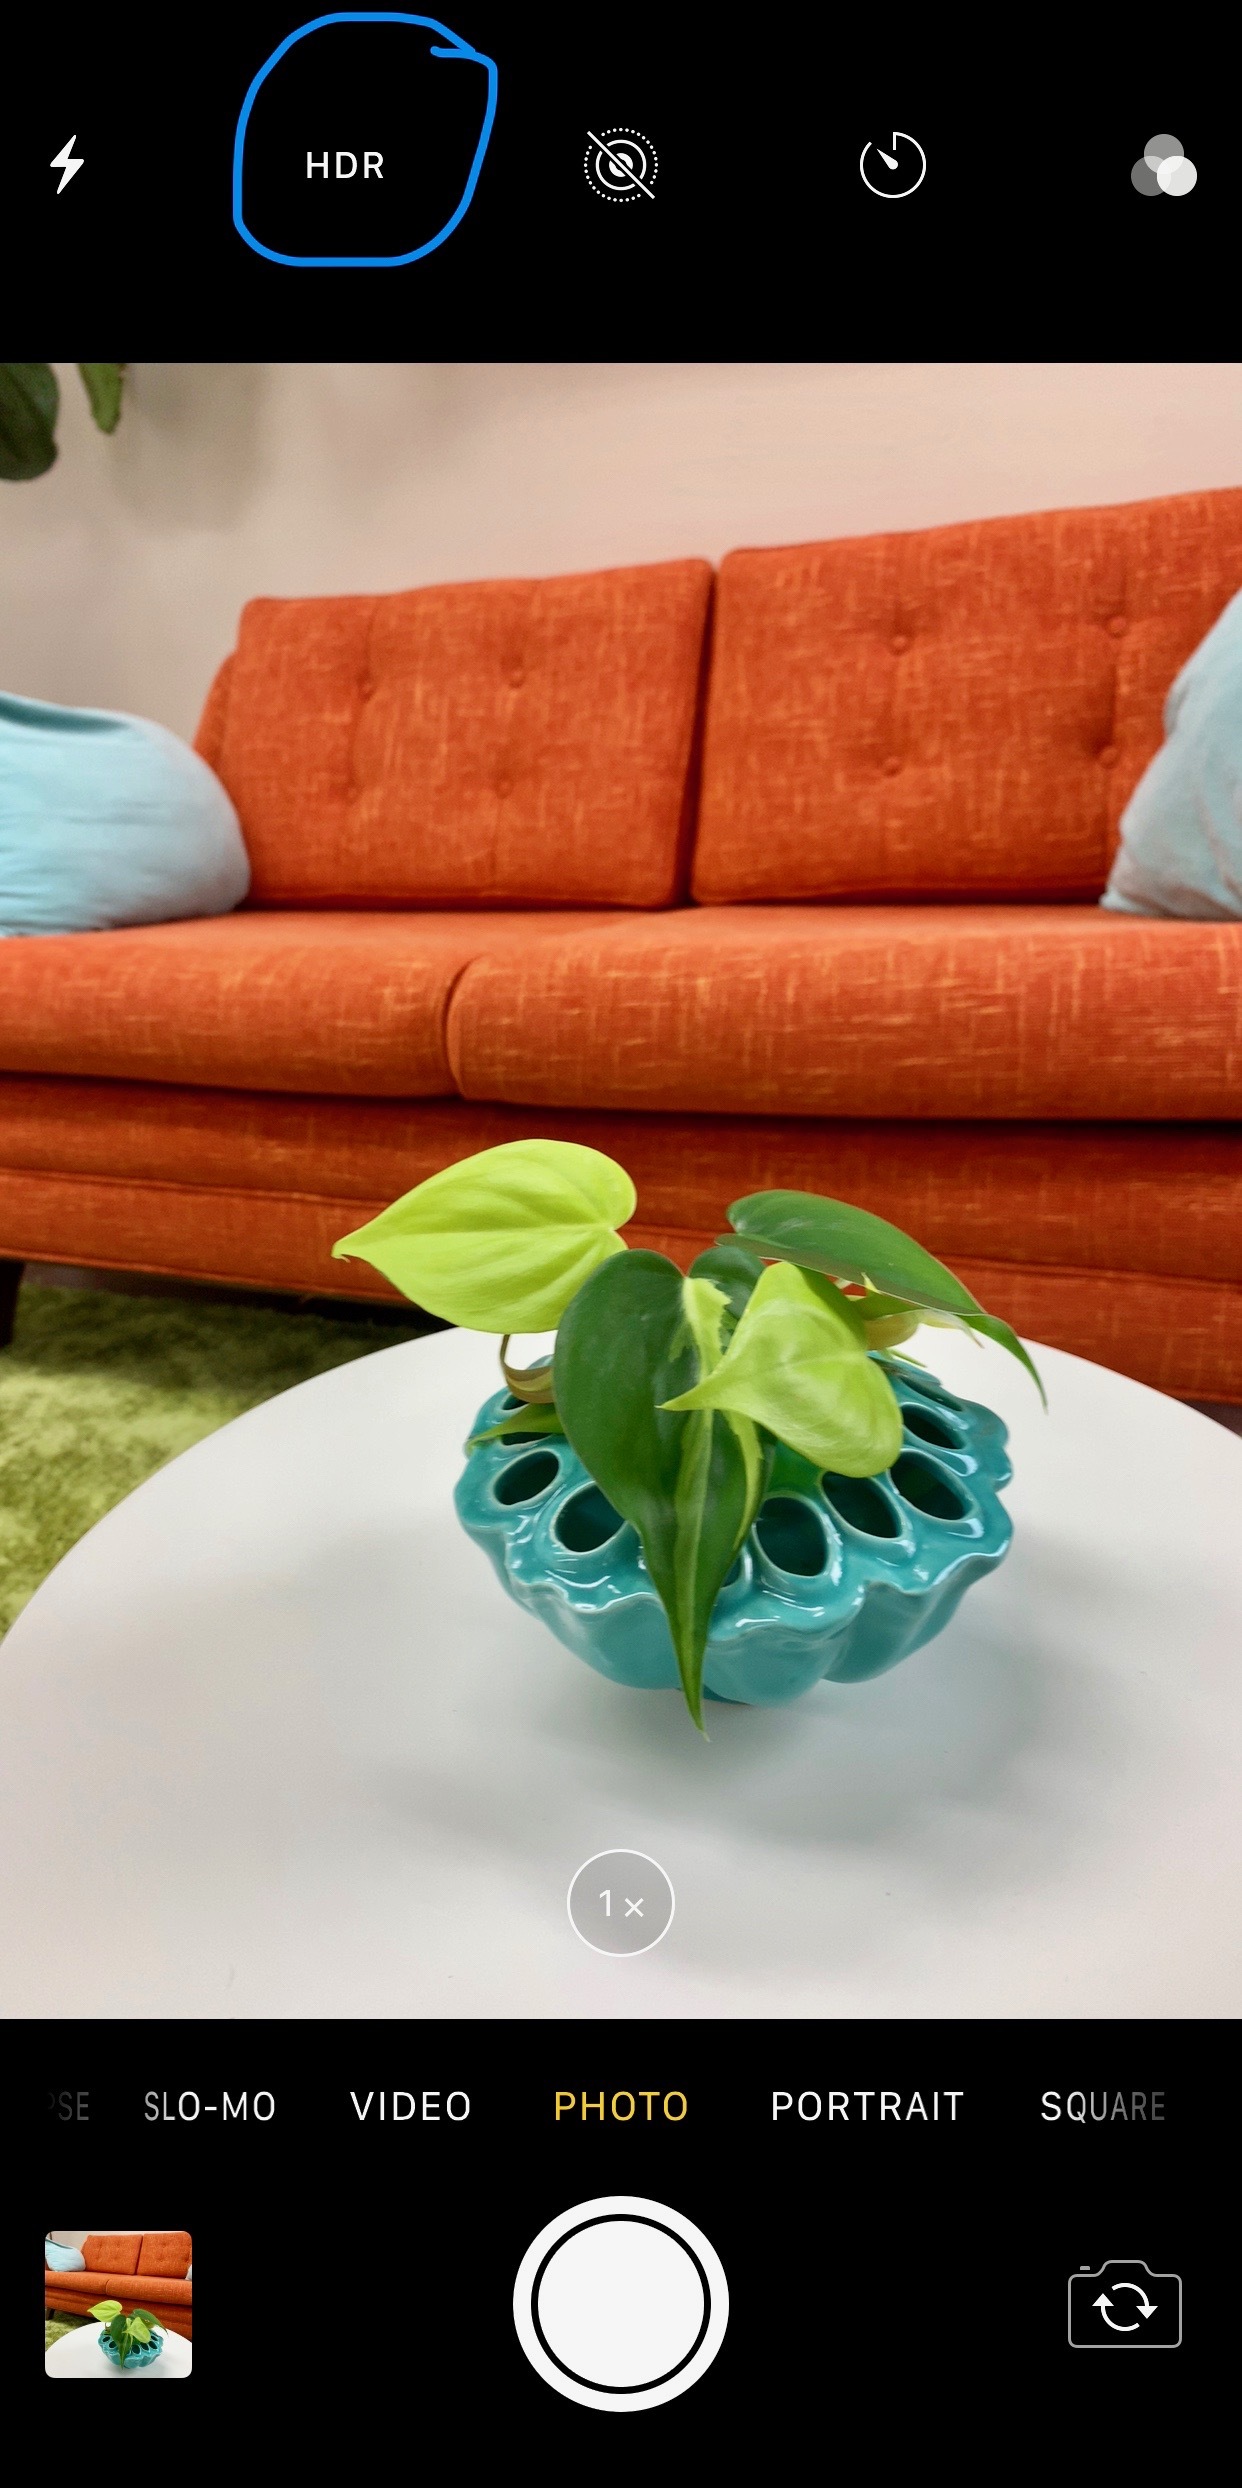
• Next: Open your iPhone camera app.
You’ll see HDR at the top and it may have a bar crossed through it to signify it is off. Tap HDR to remove the bar and turn it on. On some phones, you may need to tap ON. Now your phone camera will take images in HDR mode.
Composition & Focal Points
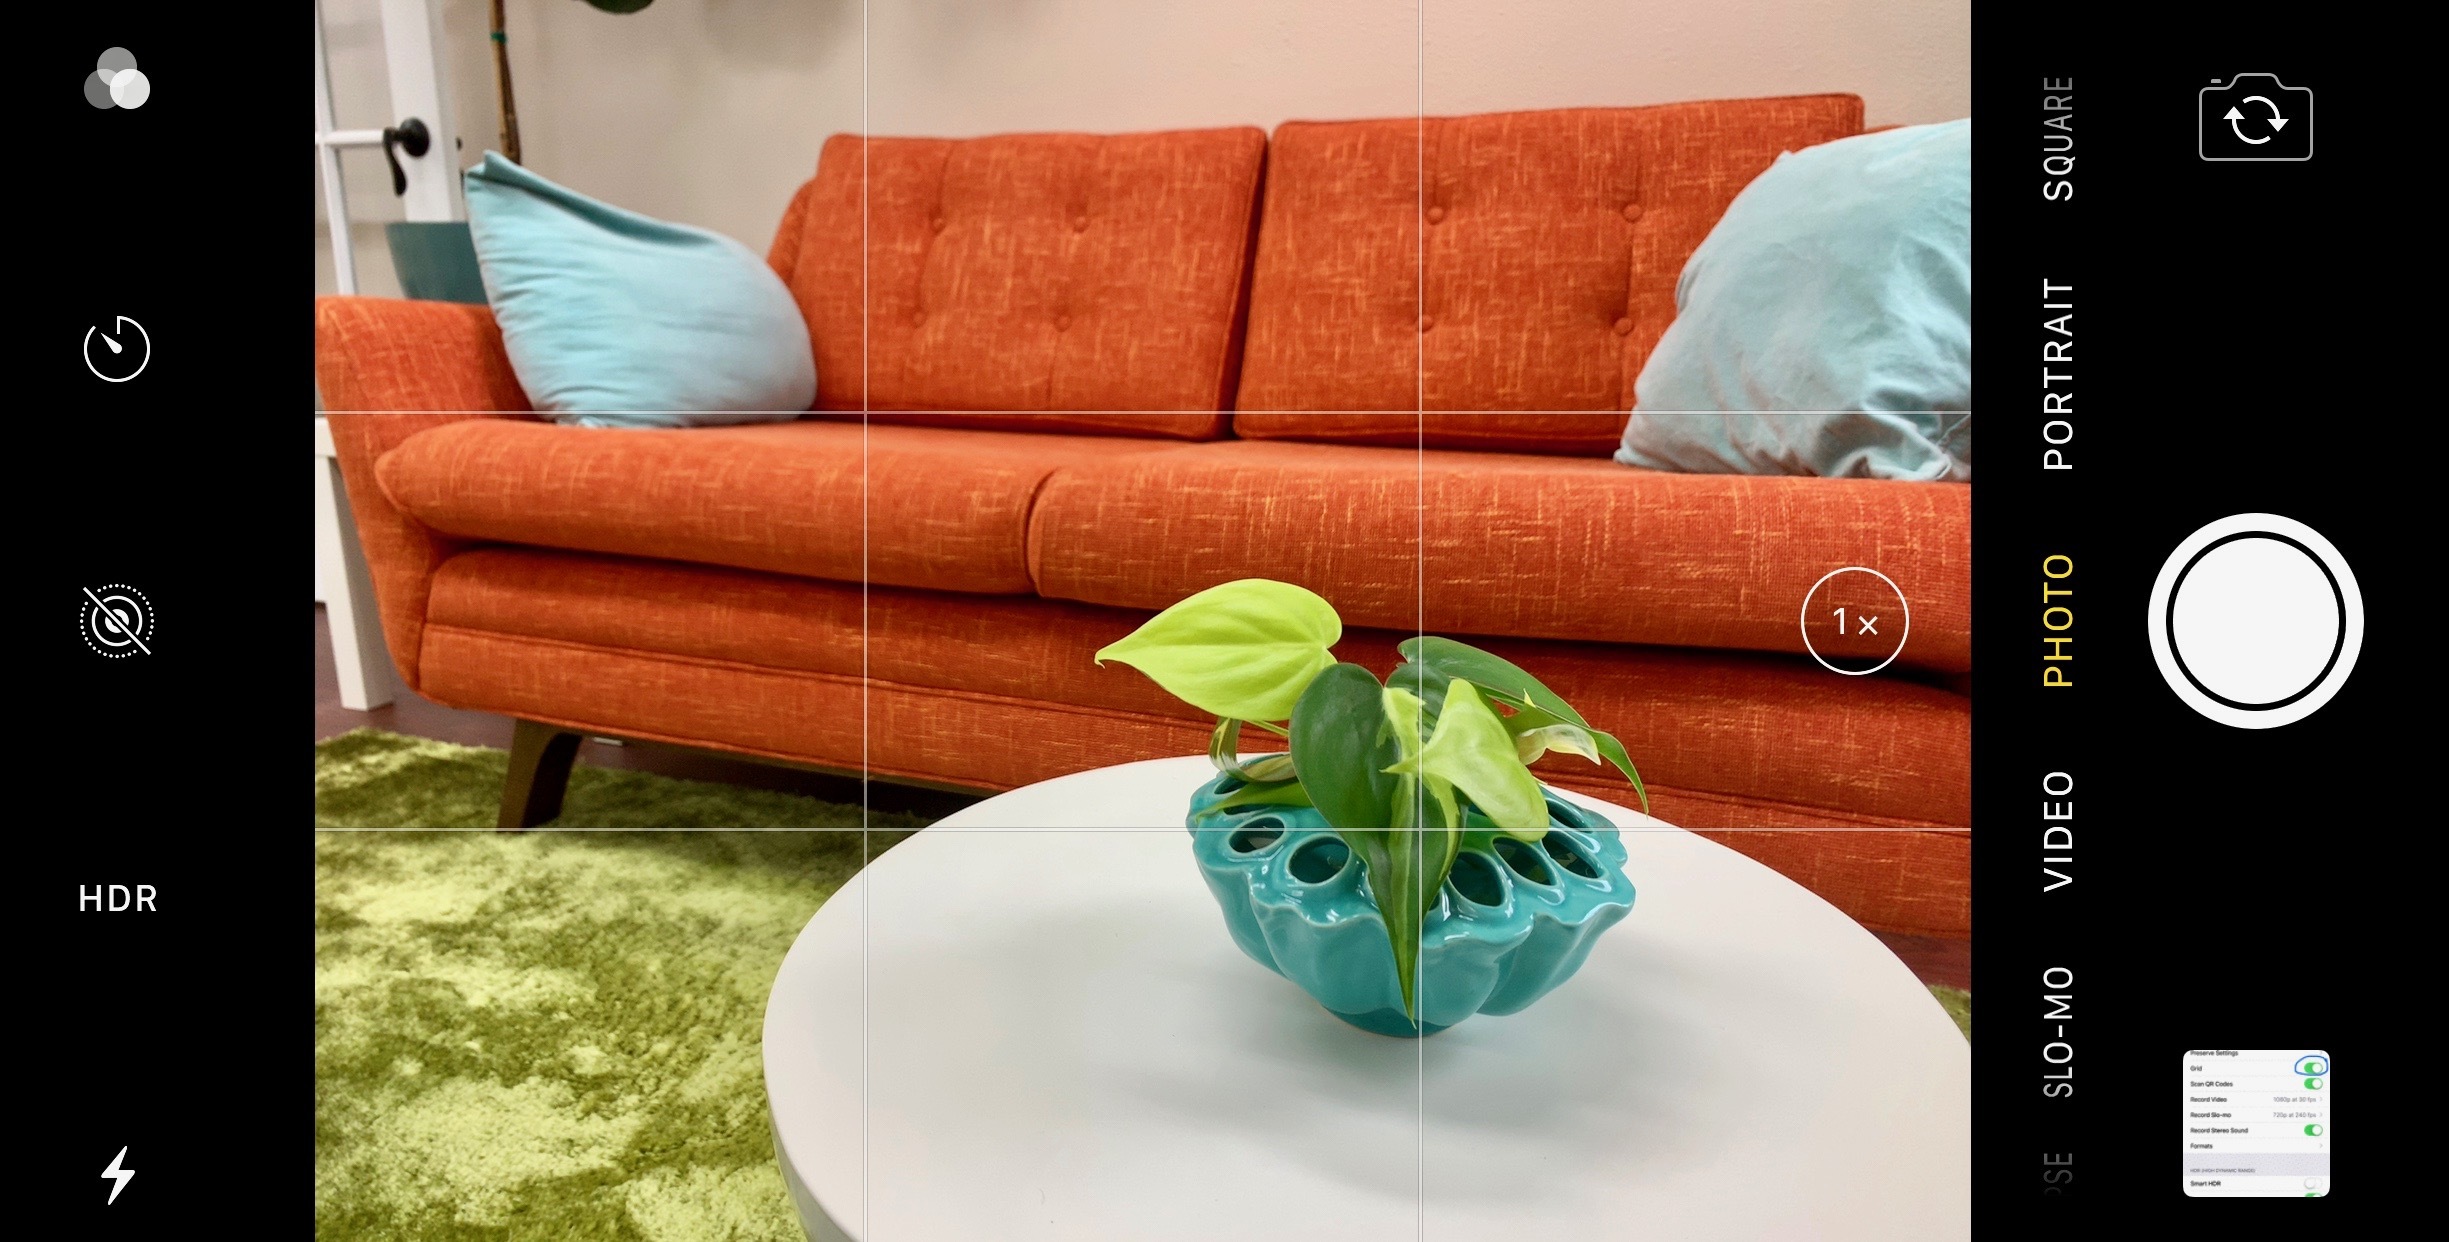
A good photograph, whether you’re taking it for Instagram or your website, relies on good composition. To help you achieve better composition, think about how professional photographers set up landscape shots (and artists compose paintings). Using the rule of thirds, you’ll align your image. If you’re taking a landscape shot, you usually want the sky portion to take up the top 2/3rds of the frame.
Focal points are usually located at one of the four central points on a grid. A grid, which divides up a frame into these sections will help you position your main subject as a good focal point, as well as position a “horizon” for your image.
• First: Go back to Settings and Camera. Turn ON the Grid setting.
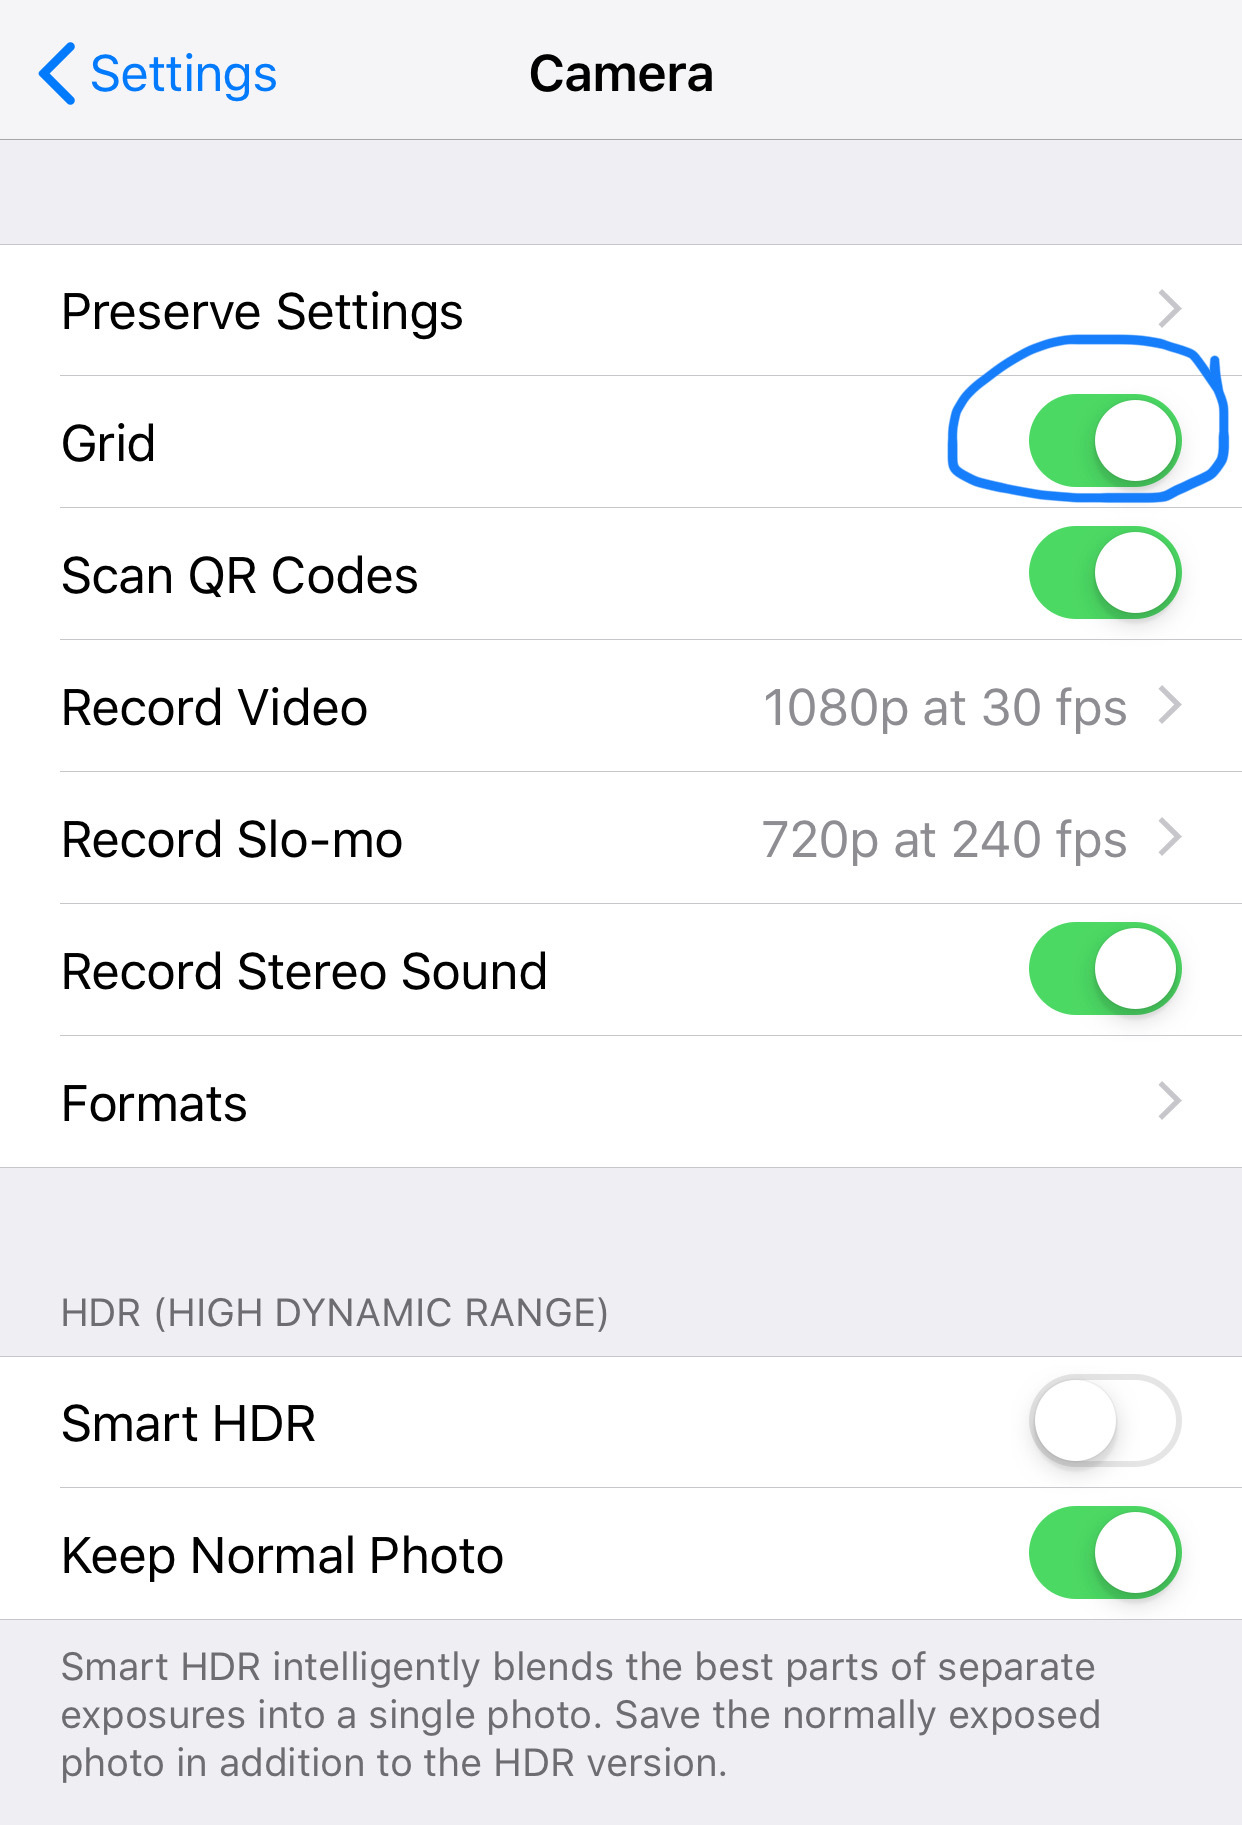
• Next: Go back to your camera app and now you’ll see grid lines running through your screen. Use these grid lines to compose your image before you snap it.
Get Perspective
Taking a photo of a plant, product or scene straight on is what most of us usually do. But getting a new perspective can set your image up with a much better composition. Try squatting down when you take your photo. Often, by squatting down, you’ll get a better perspective on the shot and be better able to align a more pleasing composition.
Lighting
It’s no secret that bad lighting will ruin a good photo. No matter how beautiful your subject, light that is too bright or too dark leaves you with a poor representation. Many of us in the garden center world take a lot of photos outdoors. Bright sunlight will overexpose your image and leave it blurry. Avoid the midday sun when taking your outdoor photos.
Go Landscape
While most photos used on Instagram get squared up anyway, it’s still a good idea to take most images (and video) using a landscape orientation — that means turning your phone sideways. Portrait shots — taken with your phone oriented up and down — are sometimes useful, and again, can often be cropped on Instagram. That said, most websites and social media platforms will display landscape orientated photos better and you’ll find them easiest to use.
Extra Features
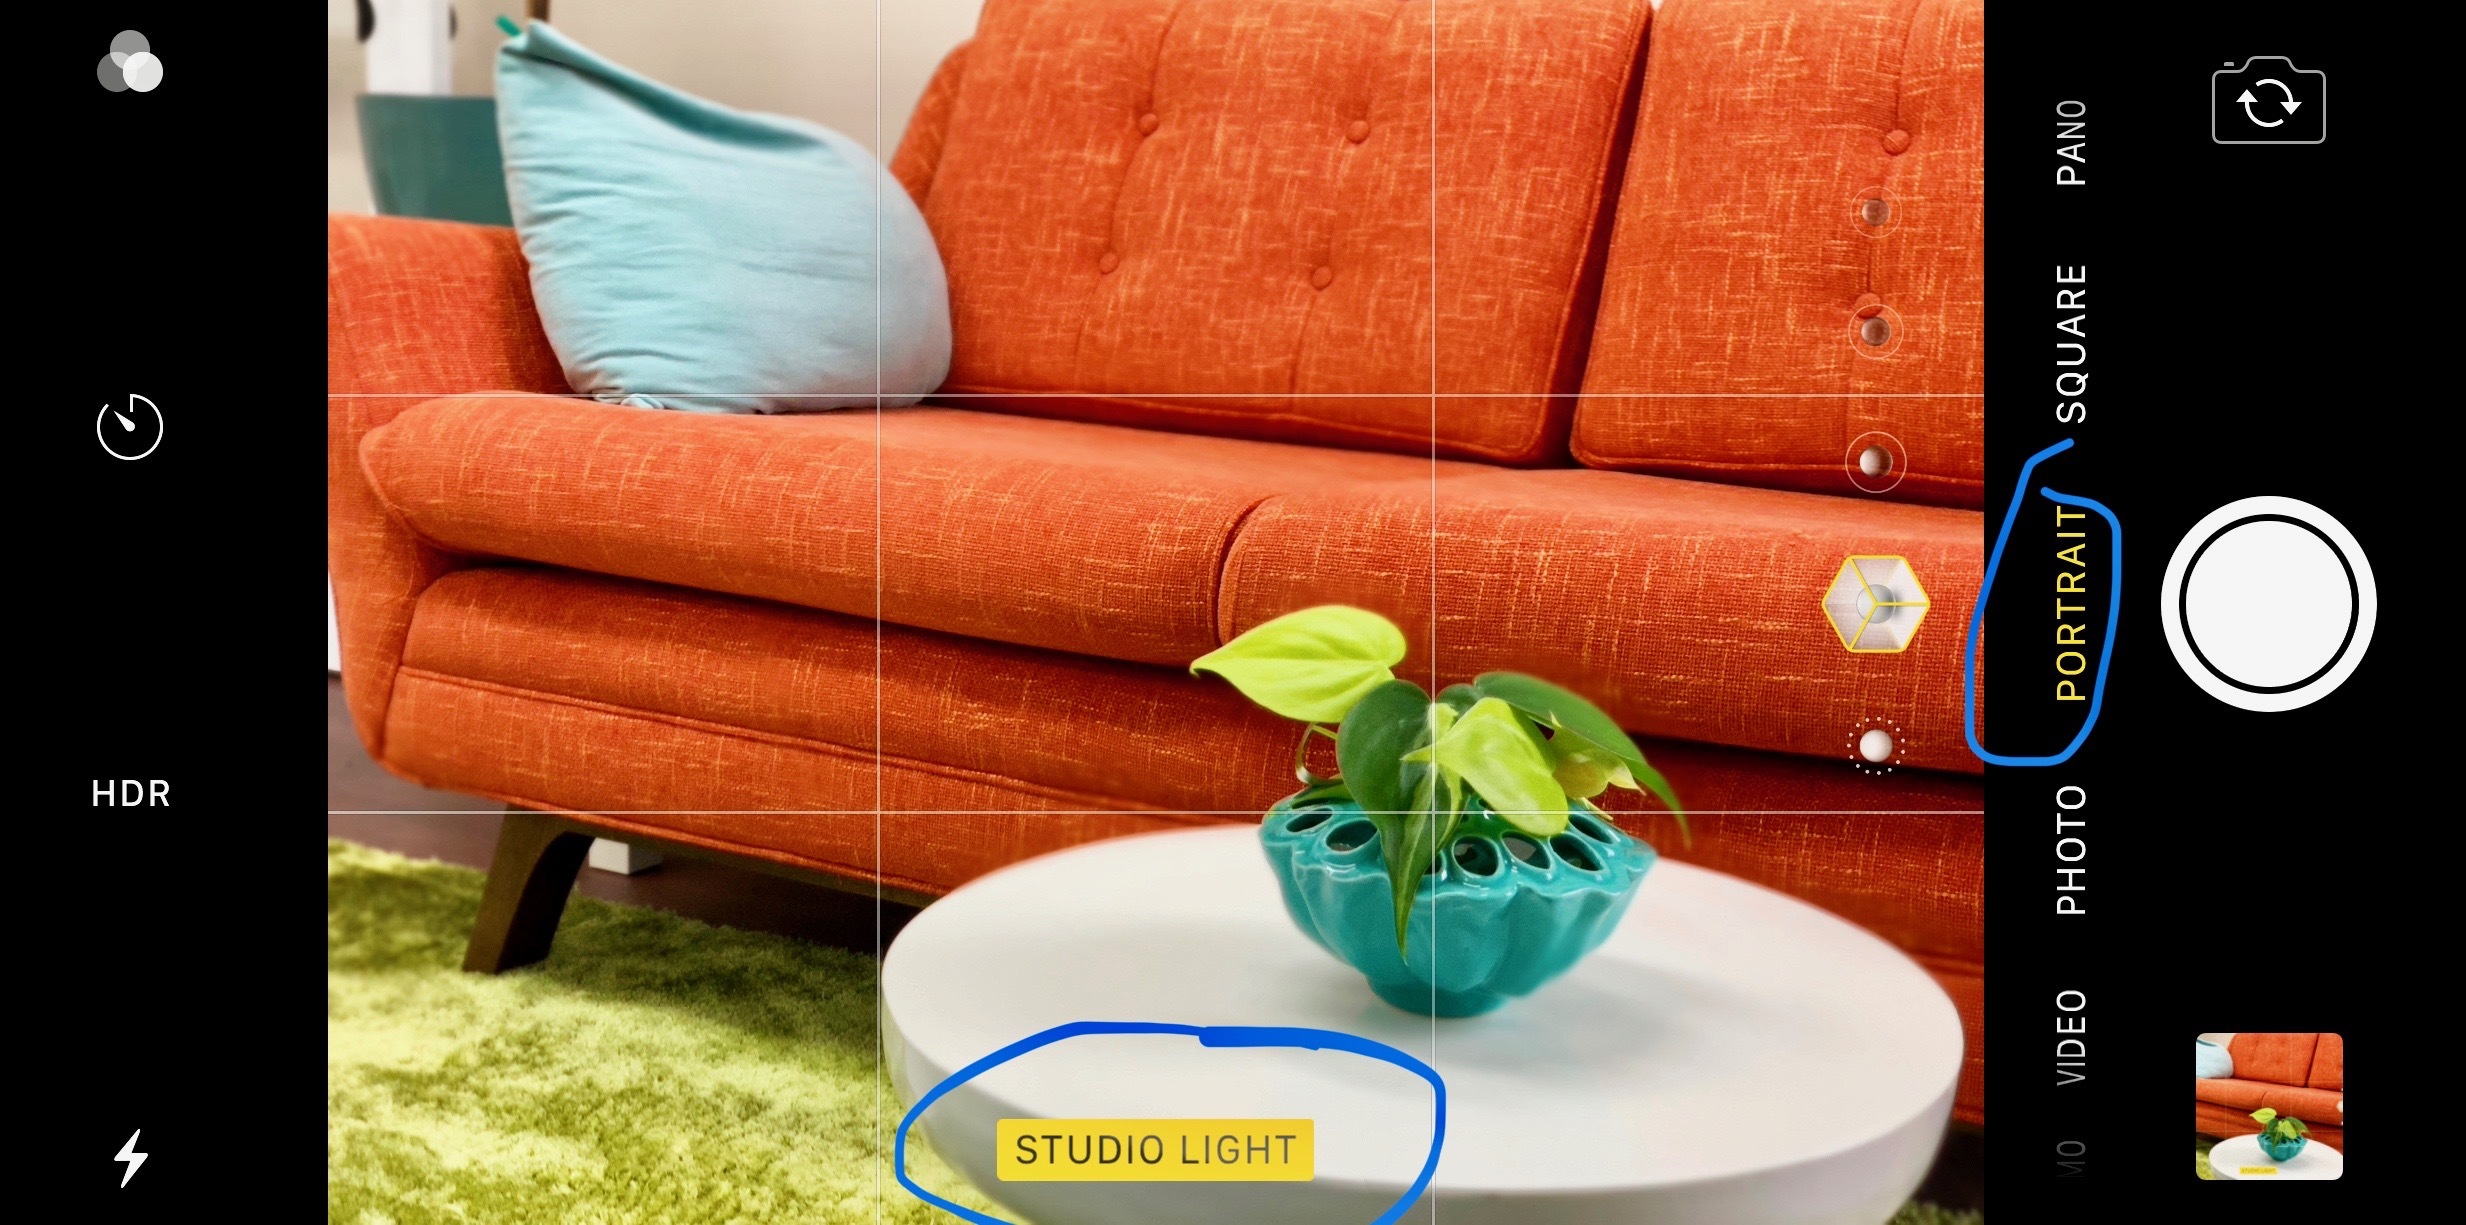
Make sure to play around with some of the cool extra camera features on your smartphone. The iPhone Panoramic shots are a great way to get a wide shot of your garden center or merchandised setup. Just make sure to follow all of the previous guidelines when you’re taking them and keep a steady hand. The Portrait feature also makes your photos look much more professional by creating the appearance of an aperture change and depth.
Get Organized
Just as important as taking the photos is organizing the photos — or else you’ll never use them. Decide on where you and your staff will upload and store company photos, and how you’ll organize them by folders. Set a schedule for how often to upload photos so they don’t get lost in the smartphone void.
If you’re going to invest in a premium print piece, such as a catalog or a high-dollar print ad, then I recommend you go pro. Hiring a photographer for a one-day or half-day session to get a handful of amazing high resolution photographs will set you apart from the crowd.
Leslie (CPH) owns Halleck Horticultural, LLC, through which she provides horticultural consulting, business and marketing strategy, product development and branding, and content creation for green industry companies.